Free SO2 testing is likely the most common laboratory test performed in wineries regardless of size, with addition rates determined based on the result. In a 2019 survey of winemakers attending a WRE seminar on SO2 management, most Virginia wineries (90% of respondents) are measuring SO2 in-house using aeration oxidation (50%), Ripper titration (30%), or autotitration (20%), which is a modification of the Ripper method. Unfortunately free SO2 tests do not come with standard solutions because we cannot fix SO2 in the free form, eventually it will bind up and no longer be free. So how reliable are our results? Which of the available methods is best, and can a winemaker be sure he/she is working with a reliable number? In this newsletter we will examine the different methods for measuring free SO2 in a small to medium sized winery, discuss quality control measures and pros and cons of each approach. Specific protocols may differ among wineries, but these basic principles will apply broadly. For specific protocols to use in your own winery, we recommend those found in “Chemical Analysis of Grapes and Wine” (Iland et al 2004) and Wine Analysis and Production (Zoecklein et al 1995), though several textbooks and lab manuals will contain good examples.
Regardless of which method you use, it is important to use the appropriate measurement device. Any lab method has a limit to how robust it is to changes to the procedure1. Some steps require very careful measurement while others do not. If the protocol calls for dilution with a volumetric flask, this tells you that there is little room for error in this step. Volumetric pipettes are more accurate than transfer pipettes, and transfer pipettes are far better than graduated cylinders. It is worth the limited expense to purchase the appropriate measurement device in order to ensure a more accurate and precise result.
The Ripper method relies on a redox reaction between sulfur dioxide and iodine. The wine is first acidulated with sulfuric acid to reduce cross reaction of iodine with wine polyphenols2. Starch is added as an indicator that will turn color when it complexes with iodine. When Iodine is initially titrated into the wine/acid/starch mixture, sulfur dioxide from the wine reacts with iodine before it can complex with the starch, so there is no color change. When all of the sulfur dioxide has been complexed with iodine, excess iodine reacts with the starch to form an inky black end product, indicating the end to the titration. Based on the volume of iodine used, the amount of sulfur dioxide can be calculated with a simple conversion factor based on the concentration of iodine2–4.
There are several elements to the Ripper titration that make it attractive for the small to medium sized winery. The entire procedure if very fast, it requires very little equipment (a burette, a flask, a pipette and a desk light, Figure 1), and it is very inexpensive (Table 1). However, there are several known inaccuracies with this approach. Once acidulated, SO2 is volatile and can be lost from the liquid/air interface during swirling4. Determination of the endpoint by a color change can be difficult in deeply colored red wines. Most importantly, there are other compounds in the wine matrix that also bind to iodine, most notably phenols, sugars, aldehydes, and ascorbic acid. This leads to an overall overestimation of SO2 present2,3.
If you are using the Ripper titration, there are some steps to take to make it as accurate as possible. A pinch of bicarbonate can be added to blanket the liquid/air interface with CO2, making volatilization of SO2 and dissolution of O2 less likely2,3. A small desk lamp can be used to provide backlight to the titration, making endpoint determination easier. Due to the instability of iodine, the concentration of this solution should be checked weekly, or potassium iodate could be used in its place to create iodine in situ5.
General QC recommendations also include
Several manufacturers, including Vinmetrica and Hanna Instruments, have developed oxidation/reduction sensing probes that detect a change in the current of the wine in the presence of excess iondine6. Sensing redox potential as opposed to a color change allows a better determination of the reaction endpoint in darkly colored wines2. The Hanna Instruments autotitrator also reduces human error by automating the titration step. However, since these methods still rely on the Ripper method, they are still subject to interferences from other wine components and iodine should be used promptly or standardized.
The aeration oxidation method seeks to avoid interferences by other components of the wine matrix by separating SO2 from the wine prior to measurement. During AO, acid is added to wine which is then subjected to either negative pressure (vacuum) or positive pressure (bubbling air) that separates molecular SO2 from the liquid. This gaseous SO2 passes through tubing to a second receptacle where it is trapped by a hydrogen peroxide solution, forming sulfuric acid. Because the wine is initially acidulated, most of the SO2 is in the molecular form and therefore measurable. After a measured amount of time (dependent on flow rate), the amount of sulfuric acid in the peroxide trap is determined by titration with NaOH. Though this methodology still relies on a color change to determine the end of titration, the peroxide solution is clear and therefore the endpoint is easier to read than in the Ripper titration2,3. However, several other difficulties remain
Aeration oxidation requires a more elaborate setup than the Ripper titration (Figure 1) with higher initial cost and longer reaction time (15 minutes per test). It still relies on a trained technician to accurately determine the endpoint, and care must be taken to keep solutions up to date. Because this method relies on separation by air movement, the flow rate of air through the wine must be calibrated, and the reaction must be carefully timed as too much or too little will affect the resulting value. When setting up the reaction, all tubing must be secure as any leaks will cause SO2 to escape, leading to aberrantly low values2–4.
General QC recommendations also include:
In recent years, a third category of free SO2 determination has become available to the medium sized winery. This methodology relies on a quantitative reaction of bisulfite in the wine with fucsin and formaldehyde to produce a colored compound that can be measured with a spectrophotometer*5,7. A standard curve is built using standard solutions allowing for calibration within the protocol. Many medium sized wineries use spectrophotometers for measurement of volatile acidity, malic acid, residual sugar and juice nutrients, so this methodology adds one more function to this instrument. The reaction itself has been condensed into kit form by several manufacturers (Unitech, Vinessential, Megazyme and others) and can be run with an automated protocol on instruments such as the Chemwell. Several QC protocols are included in the kit procedure including sample blanking to avoid absorbance by polyphenols and pigments and use of a second reading to determine true SO2 vs. other oxidizable compounds that have reacted with reagents.
This methodology has been shown in internal documentation to be within 7ppm of traditional measures (Ripper and AO), with average differences of 1.5ppm for Chardonnay and 5ppm for red wines, with lower variation than either traditional metod5. However, this study was done on an automated spectrophotometer, which comes at considerable cost ($11,000-25,000 at the time of this writing). Package inserts from Megazyme and Vintessential also taut close correlation (r2=0.999) with results from AO measures of the same wine, leading to average differences of 1 mg/L (SD 4 mg/L). These kits can be used with a manual spectrophotometer, allowing several reactions to be processed in one run (decreasing time per test), however, manual operation includes the need for a trained technician as well as introducing potential error from pipetting, timing, cuvette cleanliness, etc… In a review of laboratory proficiency over 13 years and over 70 laboratories, Howe et al (2015) found spec based methods for free SO2 determination had very high values for variation. These authors hypothesize high values are due to a combination of factors including poor calibration of the spectrophotometer, pipette calibration, inappropriate cell path length, and dilution errors.
*The Vintessential kit relies on a different reaction than the Unitech and Megazyme kits. This approach includes acidification of the sample, leading to issues of bisulfite dissociation that will be discussed in the “Headspace” portion of this newsletter. Other aspects of the protocol (potential for automation, pipetting error, etc…) will apply to this kit.
Several other methodologies for detection of sulfur dioxide in wine have been investigated8–11, however, most are either not yet ready for the production laboratory or they require expensive instrumentation and skilled operators that place them out of reach for small to medium sized wineries. These approaches are exciting developments and will be reported on as they become accessible for Virginia winemakers.
Figure 1: Comparative glassware needs and setup for the Ripper titration and Aeration Oxidation testing ($395) (www.carolinawinesupply.com)(gillypad.weebly.com)
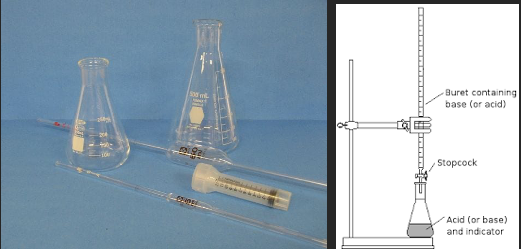
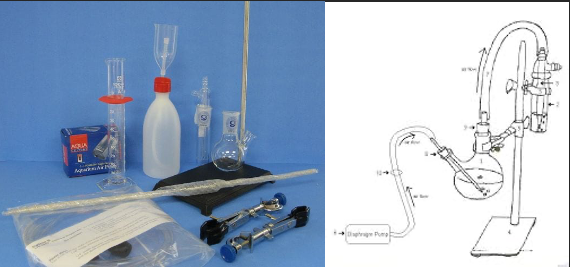
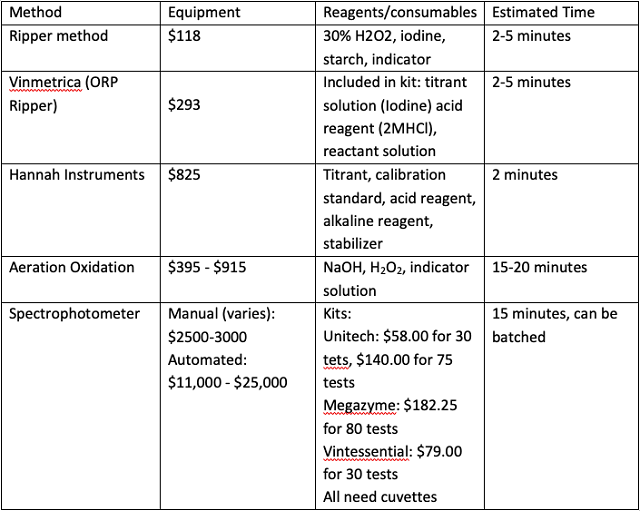
Table 1: Comparative cost of materials and supplies for various methods of SO2 determination
References
(1) Butzke, C. E.; Ebeler, S. E. Survey of Analytical Methods and Winery Laboratory Proficiency. American Journal of Enology and Viticulture 1999, 50 (4), 461–465.
(2) Zoecklein, D. B. Sulfur Dioxide (SO2). Enology Notes Downloads, 16.
(3) Iland, P.; Bruer, N.; Edwards, G.; Weeks, S.; Wilkes, E. Chemical Analysis of Grapes and Wine; Patrick Iland Wine Promotions PTY LTD: Campbelltown, Australia, 2004.
(4) Buechsenstein, J. W.; Ough, C. S. SO2 Determination by Aeration-Oxidation: A Comparison with Ripper. 1978, 29 (3), 4.
(5) Anderson, G. Free & Total Sulfur Dioxide Measurement. 9.
(6) Vinmetrica SC-100A User Manual Version 3.1c. Vinmetrica.
(7) Megazyme Free Sulfite Assay Procedure Manual. Megazyme 2017.
(8) Luque de Castro, M. D.; González-Rodríguez, J.; Pérez-Juan, P. Analytical Methods in Wineries: Is It Time to Change? Food Reviews International 2005, 21 (2), 231–265.
(9) Monro, T. M.; Moore, R. L.; Nguyen, M.-C.; Ebendorff-Heidepriem, H.; Skouroumounis, G. K.; Elsey, G. M.; Taylor, D. K. Sensing Free Sulfur Dioxide in Wine. Sensors 2012, 12 (8), 10759–10773.
(10) Coelho, J. M.; Howe, P. A.; Sacks, G. L. A Headspace Gas Detection Tube Method to Measure SO2 in Wine without Disrupting SO2 Equilibria. American Journal of Enology and Viticulture 2015, 66 (3), 257–265.
(11) Jenkins, T. W.; Howe, P. A.; Sacks, G. L.; Waterhouse, A. L. Determination of Molecular and “Truly” Free Sulfur Dioxide in Wine: A Comparison of Headspace and Conventional Methods. Am J Enol Vitic. 2020, 71 (3), 222–230.
This protocol for a fast heat test measures the change in turbidity after heating as an indicator of protein stability. Bentonite trials are run concurrently with a non-treated control to determine the dose of bentonite needed to achieve protein stability.
The bentonite used for the trial should be from the same manufacturer, brand, and batch as the bentonite that will be used in the wine. Make up a new stock solution in the event a new bag of bentonite is opened.
CMC products (like Celstab or Claristar) are commonly used to achieve tartrate stability without having to cold stabilize large tanks of wine. These products require that the wine be protein stable prior to treatment because their addition can trigger protein haze formation. (CMC is a carbohydrate that can complex with protein to cause haze.) Though CMC instability has been reported in rare cases to take as long as 48 hours (with a single reported case at 4 months)(Eglantine Chauffour, personal communication), most instability occurs immediately.
If you plan to use a CMC-based product and want to first test to determine your wine is fully protein stable for this addition, the following protocol is recommended:
References
The above protocol was adapted using information from the following sources
(1) Esteruelas, M.; Poinsaut, P.; Sieczkowski, N.; Manteau, S.; Fort, M. F.; Canals, J. M.; Zamora, F. Comparison of Methods for Estimating Protein Stability in White Wines. American Journal of Enology and Viticulture 2009, 60 (3), 302–311.
(2) Pocock, K.; Waters, E.; Herderich, M.; Pretorius, I. Protein Stability Tests and Their Effectiveness in Predicting Protein Stability during Storage and Transport A W R I Report. Wine Industry Journal 2018, 23 (2), 40–44.
(3) Weiss, K. C.; Bisson, L. F. Effect of Bentonite Treatment of Grape Juice on Yeast Fermentation. American Journal of Enology and Viticulture 2002, 53 (1), 28–36.
(4) Iland, P.; Bruer, N.; Edwards, G.; Weeks, S.; Wilkes, E. Chemical Analysis of Grapes and Wine; Patrick Iland Wine Promotions PTY LTD: Campbelltown, Australia, 2004.